How to Filter SuperScan Results
After the device scan completes, SuperScan displays a new virtual folder with the name "SuperScan" and a date and time stamp. The contents of this folder is displayed in the right panel.
You may treat this new folder and its contents the same way that you treat other device nodes in the list. You may follow the same steps to scan the folder, then search for files and folders to be recovered.
After you complete a SuperScan, you may find hundreds of partitions. Partitions may have been created and then deleted. If you have virtual VMware workstation profiles (from VMware, Inc.), these files also contain partition information.
To reduce the amount of work, you may use a filter so that you are working with a smaller set of data. After the SuperScan, all types of data are displayed. When you change the settings in the filter dialog box, you can display only selected types of data.
Filtering SuperScan Results:
- After running SuperScan, select the device node virtual folder with the name SuperScan [date time stamp].
- Right-click the device node. From the context menu choose Filter... The Filter Found Partitions dialog box appears.
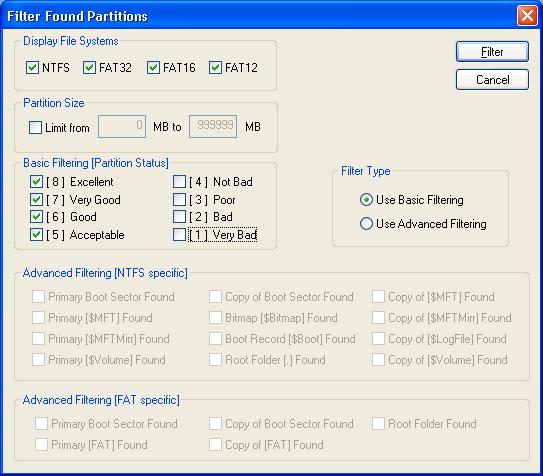
- To select the types of file systems to display, in the Display File Systems area, clear the check box beside the types that you do not want to display. Only the selected types of file systems data will be displayed.
- To display only those partitions within a specified size limit, in the Partition Size area, indicate the minimum and maximum sized partitions in MegaBytes. Only those partitions within the specified range will be displayed.
- To use basic filtering parameters, in the Filter Type area, click Use Basic Filtering.
- To select displayed partitions based on partition status, in the Basic Filtering [Partition Status] area, clear the check box next to each partition status number that you do not want to display. Only the selected status ratings will be displayed.
- To use advanced filtering parameters, in the Filter Type area, click Use Advanced Filtering.
- To restrict displayed results for NTFS-specific parameters, in the Advanced Filtering [NTFS specific] area, select the check box beside all the types of data that you want to display.
- To restrict displayed results for FAT-specific parameters, in the Advanced Filtering [FAT specific] area, select the check box beside all the types of data that you want to display.
- Click Filter.
The right panel displays the filtered results.